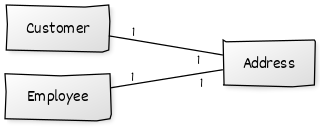
In this post I’m going to implement a small demo to show the behavior of the Singleton Scope applied to a Bean in a Spring Boot Application. Before doing that let’s think about what beans in the Spring world are.
The beans are the backbone of an application. They are objects instantiated, assembled and managed by a Spring IoC container of which the ApplicationContext interface is responsible for.
The scope of a bean defines the life cycle and visibility of that bean in the contexts in which it is used. The latest version of Spring framework defines 6 types of scopes:
- singleton
- prototype
- request
- session
- application
- websocket
For now I’m going to focus on the first one Singleton Scope. Using singleton scope (the default scope) the container will create a single instance of that bean and all request for that bean will return the same object. That means that all modification will be reflected in all references to that bean.
Let’s create from an Address, a Customer and an Employee entity.

Let’s also define the @Configuration annotated class, where to specify the initialization of the Customer and Employee bean to use the Singleton Bean Address.
@Configuration
public class Config {
	@Bean
	@Scope("singleton")
	public Address personSingleton() {
		return new Address();
	}

	@Bean
	public Customer customer(Address address) {
		Customer customer = new Customer();
		customer.setAddress(address);
		return customer;
	}

	@Bean
	public Employee employee(Address address) {
		Employee employee = new Employee();
		employee.setAddress(address);
		return employee;
	}
}
If we execute this Junit Test we can see that the hashCode for these 2 objects is the same and that if we change the value of one of the Address fields both reference to the Address beans will have the updated value as well as all objects that use that reference of the bean.
@SpringBootTest
class ScopeDemoApplicationTests {
	private static final String CITY = "San Francisco";

	@Autowired
	private ApplicationContext context;

	@Test
	public void givenSingletonScope_whenSetName_thenEqualNames() {

		Address personSingletonA = (Address) context.getBean("personSingleton");
		Address personSingletonB = (Address) context.getBean("personSingleton");

		Customer customer = (Customer) context.getBean("customer");
		Employee employee = (Employee) context.getBean("employee");

		personSingletonA.setCity(CITY);
		Assert.assertEquals(CITY, personSingletonB.getCity());

		Assert.assertEquals(personSingletonA.hashCode(),
                                    personSingletonB.hashCode());

		Assert.assertEquals(customer.getAddress().hashCode(),
                                    employee.getAddress().hashCode());
	}
}
The code for this example is available in GitHub.